Many of my readers are asking help to add Related Posts Widget . I was confused because i have added all the code correctly then why my friends are not getting this hack working. So i looked the templates of all those who sent me error message . All their templates are of same structure ( labels line is appearing below post , see the screenshot below)
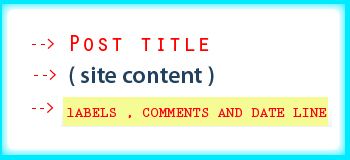
But the script i have included in the post is for those who have Label line below post title like this.

Bloggers with the above format are not getting this related posts hack because the script loads earlier than the Labels line. We can fix this error in Three methods.
Method One :
Login to your blogger account and navigate to Layout section of the blog. Then go to edit HTML page and check expand widgets box.
Now search this line : <div class=’post-header-line-1’/>
Now please copy and paste the code above that line.
<span class=’meta’>
<b:if cond=’data:post.labels’>
categories :
<b:loop values=’data:post.labels’ var=’label’>
<a expr:href=’data:label.url’ rel=’tag’><data:label.name/></a><b:if cond=’data:label.isLast != "true"’>,</b:if><b:if cond=’data:blog.pageType == "item"’>
<script expr:src=’"/feeds/posts/default/-/" + data:label.name + "?alt=json-in-script&callback=related_results_labels&max-results=10"’ type=’text/javascript’/>
</b:if>
</b:loop>
</b:if>
<b:if cond=’data:post.allowComments’>
<a class=’comment-link’ expr:href=’data:post.addCommentUrl’ expr:onclick=’data:post.addCommentOnclick’><b:if cond=’data:post.numComments == 1′> 1 <data:top.commentLabel/> »<b:else/> <data:post.numComments/> <data:top.commentLabelPlural/> »</b:if></a>
</b:if>
</span>
you can customize the text in red to display as many results you want.
Now add the below CSS code above ]]></b:skin>
.meta{float:left;width:480px;padding:3px; color:#111; font-size:12px; margin-bottom:8px; line-height:20px;border-bottom:1px dotted #cccccc;}
.meta a{color:#cc0000;}
.meta a:hover{color:#000000;}
.meta a{color:#cc0000;}
.meta a:hover{color:#000000;}
Please edit the text in red to suit your template.
After this you need to add the CSS code and javascript i provided in this post ” Related Posts Widget with custom CSS “.
Now add the script below this line <p><data:post.body/></p>
<b:if cond=’data:blog.pageType == “item”‘>
<div id=”related-posts”>
<h2>Other Recommended Posts</h2>
<script type=’text/javascript’>
removeRelatedDuplicates(); printRelatedLabels(); </script><div style=”display:none;”><a href=”http://www.techieblogger.com”>Techie Blogger</a></div>
</div></b:if>
<div id=”related-posts”>
<h2>Other Recommended Posts</h2>
<script type=’text/javascript’>
removeRelatedDuplicates(); printRelatedLabels(); </script><div style=”display:none;”><a href=”http://www.techieblogger.com”>Techie Blogger</a></div>
</div></b:if>
Thats it , now you will have related posts widget in your blog.
Method 2 :
If you follow step one then you will have two meta lines in your Blog. One below post title and one below post content. If you are happy with first method then stop or else do these steps to add related posts hack. ( don’t do both)
step 1 : First of all add the below code above </head>
<style>
#related-posts {
float : left;
width : 540px;
margin-top:20px;
margin-left : 5px;
margin-bottom:20px;
font : 11px Verdana;
margin-bottom:10px;
}
#related-posts .widget {
list-style-type : none;
margin : 5px 0 5px 0;
padding : 0;
}
#related-posts .widget h2, #related-posts h2 {
color : #940f04;
font-size : 20px;
font-weight : normal;
margin : 5px 7px 0;
padding : 0 0 5px;
}
#related-posts a {
color : #054474;
font-size : 11px;
text-decoration : none;
}
#related-posts a:hover {
color : #054474;
text-decoration : none;
}
#related-posts ul {
border : medium none;
margin : 10px;
padding : 0;
}
#related-posts ul li {
display : block;
background : url(“http://i263.photobucket.com/albums/ii150/mohamedrias/newconcept_bullet.png”) no-repeat 0 0;
margin : 0;
padding-top : 0;
padding-right : 0;
padding-bottom : 1px;
padding-left : 16px;
margin-bottom : 5px;
line-height : 2em;
border-bottom:1px dotted #cccccc;
}
</style>
<script type=’text/javascript’>
//<![CDATA[
var relatedTitles = new Array();
var relatedTitlesNum = 0;
var relatedUrls = new Array();
function related_results_labels(json) {
for (var i = 0; i < json.feed.entry.length; i++) {
var entry = json.feed.entry[i];
relatedTitles[relatedTitlesNum] = entry.title.$t;
for (var k = 0; k < entry.link.length; k++) {
if (entry.link[k].rel == ‘alternate’) {
relatedUrls[relatedTitlesNum] = entry.link[k].href;
relatedTitlesNum++;
break;
}
}
}
}
function removeRelatedDuplicates() {
var tmp = new Array(0);
var tmp2 = new Array(0);
for(var i = 0; i < relatedUrls.length; i++) {
if(!contains(tmp, relatedUrls[i])) {
tmp.length += 1;
tmp[tmp.length – 1] = relatedUrls[i];
tmp2.length += 1;
tmp2[tmp2.length – 1] = relatedTitles[i];
}
}
relatedTitles = tmp2;
relatedUrls = tmp;
}
function contains(a, e) {
for(var j = 0; j < a.length; j++) if (a[j]==e) return true;
return false;
}
function printRelatedLabels() {
var r = Math.floor((relatedTitles.length – 1) * Math.random());
var i = 0;
document.write(‘<ul>’);
while (i < relatedTitles.length && i < 20) {
document.write(‘<li><a href=”‘ + relatedUrls[r] + ‘”>’ + relatedTitles[r] + ‘</a></li>’);
if (r < relatedTitles.length – 1) {
r++;
} else {
r = 0;
}
i++;
}
document.write(‘</ul>’);
}
//]]>
</script>
step 2 :
Now search this text
<b:loop values=’data:post.labels’ var=’label’>
<a expr:href=’data:label.url’ rel=’tag’><data:label.name/></a><b:if cond=’data:label.isLast != "true"’>,</b:if>
</b:loop>
Now replace the above text with this code
<b:loop values=’data:post.labels’ var=’label’>
<a expr:href=’data:label.url’ rel=’tag’><data:label.name/></a><b:if cond=’data:label.isLast != "true"’>,</b:if><b:if cond=’data:blog.pageType == "item"’> <script expr:src=’"/feeds/posts/default/-/" + data:label.name + "?alt=json-in-script&callback=related_results_labels&max-results=5"’ type=’text/javascript’/> </b:if> </b:loop>
<a expr:href=’data:label.url’ rel=’tag’><data:label.name/></a><b:if cond=’data:label.isLast != "true"’>,</b:if><b:if cond=’data:blog.pageType == "item"’> <script expr:src=’"/feeds/posts/default/-/" + data:label.name + "?alt=json-in-script&callback=related_results_labels&max-results=5"’ type=’text/javascript’/> </b:if> </b:loop>
Now scroll down still you can find ending tag for either </div> or </span> . Now paste the following script below the ending div / span tag.
<b:if cond=’data:blog.pageType == “item”‘>
<div id=”related-posts”>
<h2>Other Recommended Posts</h2><script type=’text/javascript’> removeRelatedDuplicates(); printRelatedLabels(); </script>
</div></b:if>
<div id=”related-posts”>
<h2>Other Recommended Posts</h2><script type=’text/javascript’> removeRelatedDuplicates(); printRelatedLabels(); </script>
</div></b:if>
That’s it now you will have related Posts hack in your blog.
Third Method :
In my Blog I am using this method . It’s very simple. First do the step 1 from method 2 . ( adding script above </head> ) .
Now add the following tag below <p><data:post.body/></p> .
<b:if cond=’data:blog.pageType == “item”‘>
<div id=”related-posts”>
<h2>Other Recommended Posts on<div style=”display:none;”> <b:loop values=’data:post.labels’ var=’label’><data:label.name/><b:if cond=’data:label.isLast != "true"’>,</b:if><b:if cond=’data:blog.pageType == "item"’>
<script expr:src=’"/feeds/posts/default/-/" + data:label.name + "?alt=json-in-script&callback=related_results_labels&max-results=5"’ type=’text/javascript’/></b:if></b:loop></div> </h2> <script type=’text/javascript’> removeRelatedDuplicates(); printRelatedLabels(); </script>
</div></b:if>
Now you will have related posts widget of my style.
I hope one of the above method will help you to add related posts widget to your Blog. Still if you have problem then please contact me through comments.
About the author /
Mohamed RiasPopular


Editor’s Pick
-
April 16, 2010 35+ Breathtaking Digital Abstract Wallpapers
Digital abstracts represents the depiction of imagery in arts. Abstraction exists along a continuum. Even art that aims for verisimilitude of the highest degree can be said to be an abstract.
Artwork which takes liberties, altering the instance color and form in ways that are conspicuous, can be said to be digital abstracts.There is a wealth of potent, beautiful, digital art and fractal images on this collection, created by a vast array of inspired individuals. -
August 21, 2012 50+ Amazing Olympics Infographics Inspirations
The London Olympics 2012 has proved to be a phenomenal attraction this year – attracting eyeballs and attentions like nothing else. Well, I caught on to the Olympics buzz quite late into the second week – watched it every day from 11 in the night (IST). However, I followed it regularly over the news papers…
-
April 25, 2023 WhatsApp Multiple Device Log-in: Simplify Staying Connected Across Devices
WhatsApp, which is a widely used messaging platform, is introducing a game-changing feature that will allow users to log into their WhatsApp account on multiple devices. This much-awaited update aims to simplify staying connected across devices by making it easier for users to maintain their chats. In this comprehensive guide, we will explore the benefits…
-
June 10, 2012 Show Recent Posts With Thumbnail from Particular Label/Category in Blogger
Hey Blogger friends, Today i have come up with another cool blogger hack. It’s about showing recent posts with/without thumbnail from any particular label/category in blogger. As you can see in my sidebar, I have listed recent posts from each category, but i have done this in wordpress. So if you want to do same…
-
April 29, 2008 Hide Blogger Navigation Bar – CSS Hack
As we all know in blogger, above header there is navbar or navigation bar . Most of want to hide the navigation bar in blogger , but we don’t know how to do that. Never wonder here is a simple trick to hide the navigation bar in blogger . Follow these easy steps to paste…

1 Comment
Hi,i just follow your 1 to 3 steps(without css).But my blog didn’t show up the effect after changing the code.
Could you help me with my problem?
Cheers
Tsai