Linux users come across a common problem in which they dont find their native monitor resolution and instead they left with the default resolution of 1024*768. This is because the system couldn’t identify the graphics card driver.
Don’t worry, with simple steps you can add your own desired resolution and make the changes permanent in your system even when the “displays” menu says “unknown” monitor.
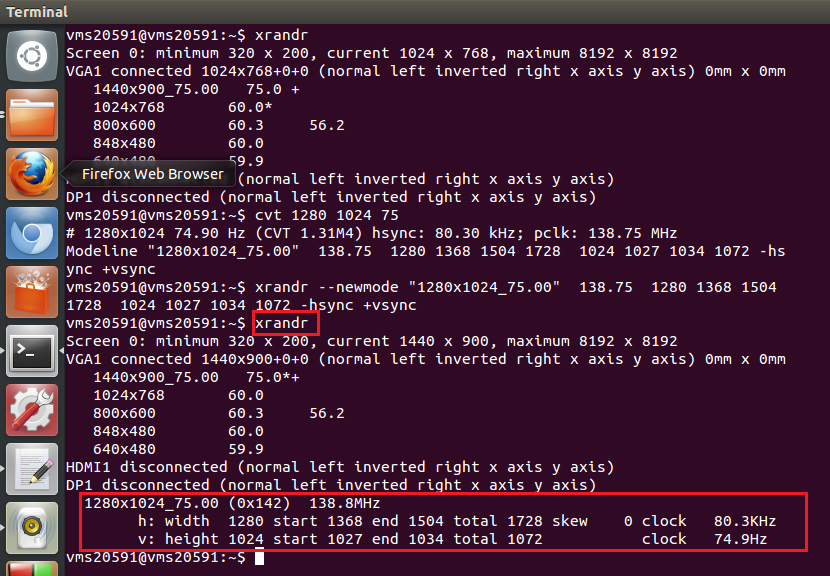
Type the following command in your terminal to know the resolutions available in your system
xrandr
- Your current resolution will be marked by ‘*’.
- Now that you identified the resolutions available its time to add your own desired resolution.
- For example, if you want to add the resolution of 1280*1024 type the following command in terminal,
cvt 1280 1024 75 (75 denotes the refresh rate in Hz).
- You will get modeline with many paramaters which will look like,
Modeline "1280x1024_75.00" 138.75 1280 1368 1504 1728 1024 1027 1034 1072 -hsync +vsync
Next, the new resolution mode can be created using the below command and press Enter
xrandr –newmode "1280x1024_75.00" 138.75 1280 1368 1504 1728 1024 1027 1034 1072 -hsync +vsync
Now you can check the new mode by typing the command,
xrandr
Next, the new mode should be added to list of native resolutions by the command,
xrandr --addmode VGA1 "1280x1024_75.00"
- Type the command to check if the resolution is added.
xrandr
Before you can mess up with the xorg.conf file which will be explained in step 6 you need to have some details in your hand like,
Identifier, for example Identifier  "Screen0"

        Device,    for example  Device    "Device0"

	Monitor,  for example Monitor    "VGA1"

	Driver,     for example Driver      “ i915”
- Mostly identifier and device name can be obtained from “displays” option from “dash home”
- While monitor can checked using xrandr and driver information can be obtained using the command,
sudo lshw -class display|grep "driver"
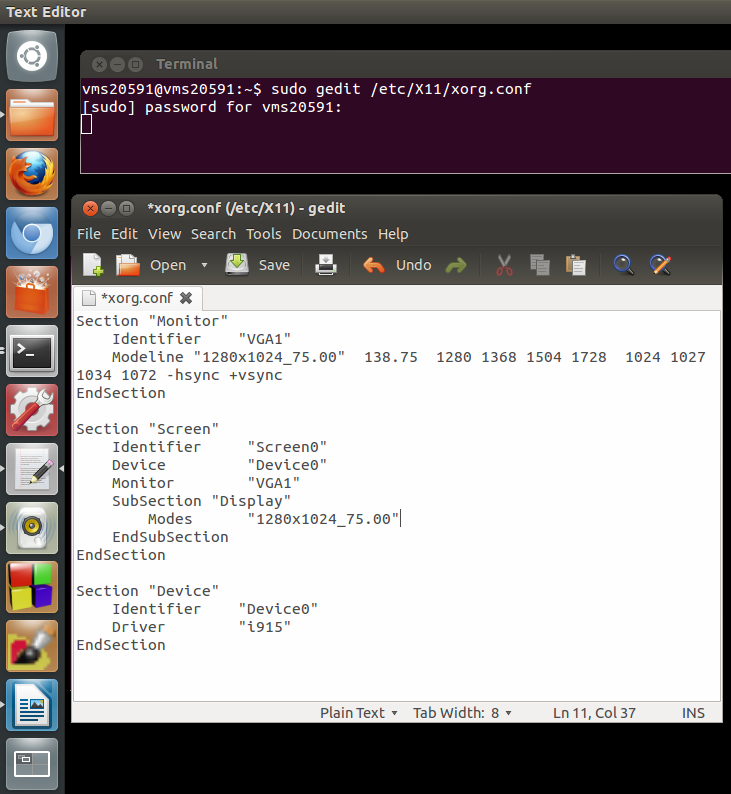
Now that you have the essential details in hand its time to make the changes permanents by editing xorg.conf file available in the location /etc/X11/xorg.conf.
To achieve this, type the following command in terminal,
sudo gedit /etc/X11/xorg.conf
Some of you would get error executing this command because here gedit indicates the text editor(like notepad) with which you are editing the xorg.conf file. So, if you are using someother text editor as default just replace gedit with it.
Don’t forget to enter your administrator password and press Enter.
Type the following in the editor,
Section "Monitor"
Identifier "VGA1"
Modeline "1280x1024_75.00" 138.75 1280 1368 1504 1728 1024 1027 1034 1072 -hsync +vsync
EndSection
Section "Screen"
Identifier "Screen0"
Device "Device0"
Monitor "VGA1"
SubSection "Display"
Modes "1280x1024_75.00"
EndSubSection
EndSection
Section "Device"
Identifier "Device0"
Driver "i915"
EndSection
- Save and close it.
The final step is setting the mode you created as active. To achieve it type the following command,
xrandr –output VGA1 –mode 1280x1024_75.00
Press enter and your screen resolution is changed.
If you get a error message “xrandr: cannot find mode 1280*1024_75.00” , the problem is with the “*” you entered so enter as 1280x1024_75.00 and not 1280*1024_75.00.
Feedback
Hope you enjoyed reading this article. We are a bunch of Linux (Ubuntu) users trying to guide you on fixing problems or on customizing Linux. If you want any particular topic to be discussed here, do let us know via comments.
Popular
Editor’s Pick
-
August 29, 2012 35+ Must Have Apps to Increase Productivity in Ubuntu
Once you have started your way through linux, you might come across numerous applications which are being developed and released everyday. You might me interested in some and you might not.So, you arrive to an ultimate question “What are the apps that will increase my productivity?. Well, the answer is in this article which consists…
-
September 21, 2009 150+ amazing Photo Manipulations for professional photographers
-
February 2, 2010 25+ Breathtaking examples of Natural sky Photography
Many times throughout the day you look up to the sky and just see a blue or grey sky without much thought. But on some days, you look out into the distance and see something beautiful, something that captivates the beauty of the sky not seen on a daily basis. This collection of photography that…
-
April 23, 2023 Mastering the Art of Timelapse Photography: Tips and Techniques
Timelapse photography is a technique that involves capturing a series of photos over a period of time and then combining them into a video sequence to create the illusion of time passing quickly. Mastering this art can add a unique dimension to your photography skills. The importance of mastering timelapse photography lies in the fact…
-
May 2, 2023 Implementing SOLID Principles in Your React Frontend Development
Learn how to improve the maintainability and scalability of your React frontend applications by implementing the SOLID principles. From Single Responsibility to Dependency Inversion, this article covers practical examples and best practices for writing cleaner, more modular code in your React codebase. Join us on this journey towards better frontend development with Implementing SOLID Principles in Your React Frontend Development.


